
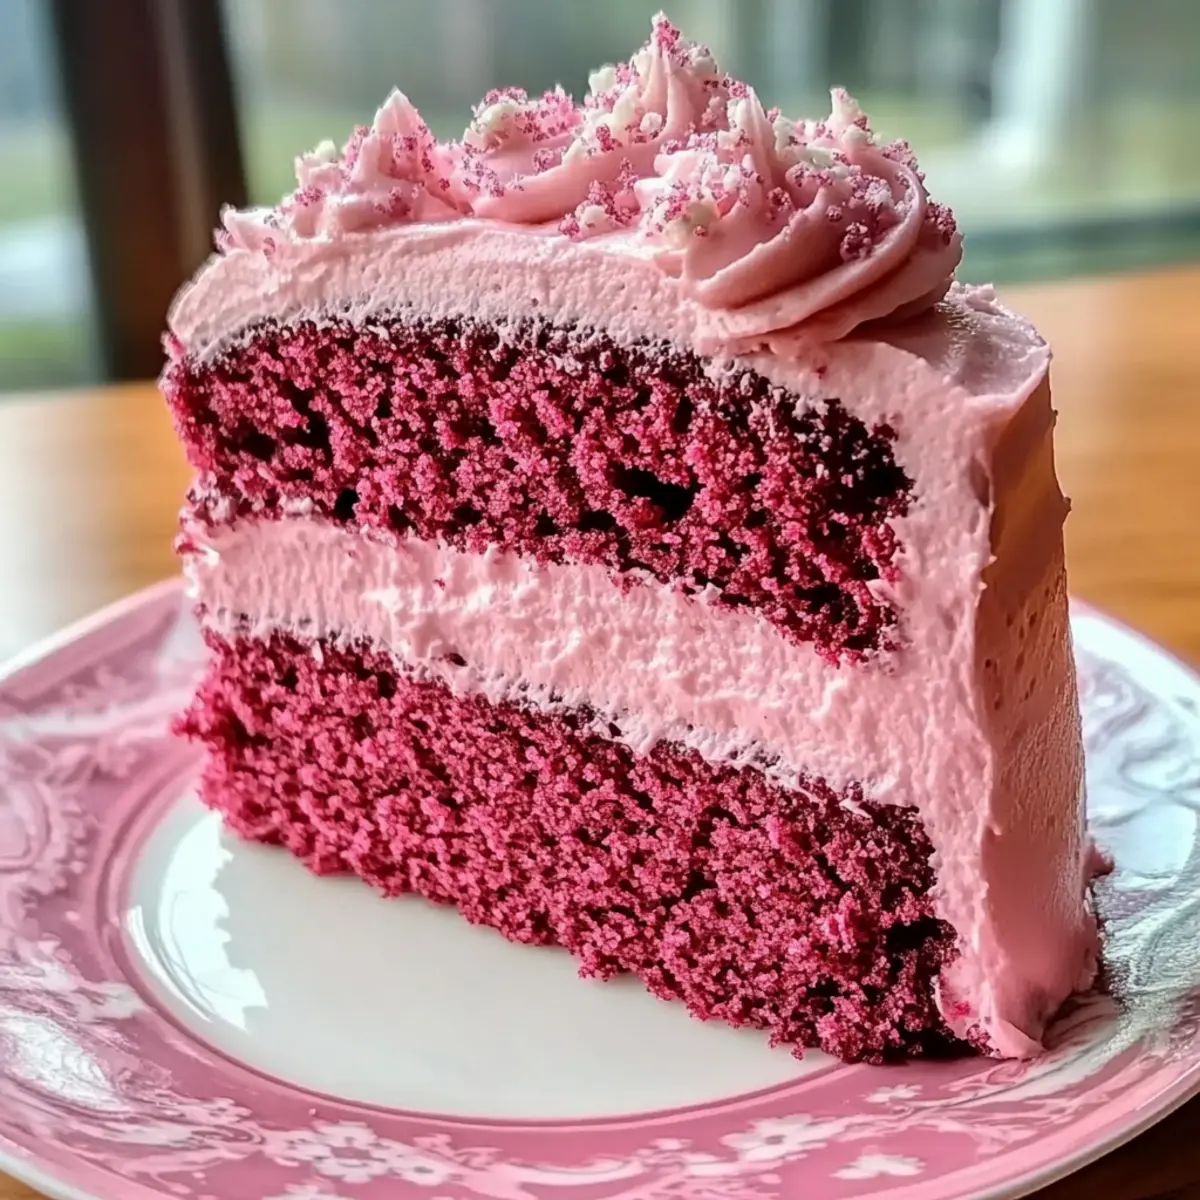
As I opened the oven door, a wave of sweetness enveloped the kitchen, instantly lifting my spirits. Baking this stunning Mother’s Day Pink Velvet Cake has become a cherished tradition in my home, and it’s no wonder why. With its soft, fluffy layers that dance between cocoa and vanilla, this cake not only dazzles the eyes with its breathtaking pink hue but also offers a delightful, creamy frosting that kids and adults alike can’t resist. What I love most about this recipe is its ease of preparation—perfect for both seasoned bakers and those just starting their culinary adventures. Plus, it’s the ultimate crowd-pleaser, making it a show-stopping centerpiece for celebrating the special women in our lives. Are you ready to whip up some joy? Let’s dive into this enchanting creation together!

Why is Pink Velvet Cake a must-try?
Enchanting flavors await with this beautiful cake that combines the best of both worlds—tender cake with rich cocoa undertones. Perfectly paired with creamy frosting, it elevates any celebration. Effortless to make, even novice bakers can succeed! Versatile in its serving options, try it with berries or ice cream for added delight. This recipe is not just for Mother’s Day; it’s ideal for any special occasion, making it a dessert everyone will adore.
Pink Velvet Cake Ingredients
For the Cake
• Cake Flour – Provides structure and lightness; if unavailable, all-purpose flour can be used, but texture may differ.
• Unsweetened Cocoa Powder – Adds rich chocolate flavor without extra sugar; dark cocoa can be substituted for a more intense taste.
• Baking Powder – Essential leavening agent for a fluffy rise; always check for freshness before use.
• Salt – Enhances overall flavor; omit only at your own risk!
• Unsalted Butter – Brings moisture and richness; make sure it’s at room temperature for the best creaming effect.
• Granulated Sugar – Sweetens the batter and facilitates that fluffy texture.
• Large Eggs – Bind the ingredients and add moisture; using room temperature eggs is ideal for easier mixing.
• Buttermilk – Boosts moisture and acidity; in a pinch, you can substitute with milk mixed with a teaspoon of vinegar or lemon juice.
• Pure Vanilla Extract – Enhances the cake’s flavor profile; opt for high-quality extract for maximum taste.
• Red Food Coloring – Gives the cake its signature pink hue; add gradually until you reach your desired shade.
For the Creamy Frosting
• Cream Cheese – Provides a rich, tangy base; always use softened cream cheese for easy spreading.
• Powdered Sugar – Sweetens the frosting and creates a smooth texture; sift it to prevent lumps.
• Unsalted Butter – Adds creaminess; ensure it’s softened for easy mixing.
• Vanilla Extract – Enhances the flavor; using pure extract will elevate the taste.
This Pink Velvet Cake is not only a visual delight but also a treat that will surely win over your loved ones!
Step‑by‑Step Instructions for Enchanting Mother’s Day Pink Velvet Cake
Step 1: Preheat & Prepare
Begin by preheating your oven to 350°F (175°C). While the oven warms, take two 9-inch round cake pans and generously grease and flour them to prevent sticking. This step is crucial for your Pink Velvet Cake’s flawless extraction, ensuring it pops out easily once baked.
Step 2: Mix Dry Ingredients
In a large mixing bowl, whisk together 2 cups of cake flour, 1 tablespoon of unsweetened cocoa powder, 1 tablespoon of baking powder, and ½ teaspoon of salt. This dry mixture forms the foundation of your Pink Velvet Cake, providing structure and flavor. Set this aside and let the aromas meld, which will elevate your baking experience.
Step 3: Cream Butter & Sugar
In a separate bowl, combine ½ cup of softened unsalted butter and 1 cup of granulated sugar. Using an electric mixer, cream these together on medium speed for about 3 minutes until the mixture is light and fluffy. This step is vital for achieving that wonderful texture in your cake, so pay attention for a pale, airy result.
Step 4: Incorporate Eggs
Add 2 large eggs to the creamed butter and sugar, one at a time, mixing well after each addition. Make sure each egg is fully incorporated before adding the next. This binding step is essential, as it adds moisture and richness to your Pink Velvet Cake, creating a delightful balance of flavors.
Step 5: Add Wet Ingredients
Once the eggs are mixed in, add 1 cup of buttermilk, 2 teaspoons of pure vanilla extract, and a few drops of red food coloring to the bowl. Mix everything until fully combined and the batter turns a lovely pink hue. This vibrant addition not only enhances the color but also enriches the flavor profile of your cake.
Step 6: Combine Dry & Wet Ingredients
Gradually fold in the dry ingredients from Step 2 into the wet mixture using a spatula. Be gentle and careful not to overmix, as this could result in a denser Pink Velvet Cake. Stop mixing when everything is just combined and has a smooth consistency, perfecting the velvety texture you desire.
Step 7: Bake the Cake
Evenly divide the batter between the prepared cake pans. Place them in the oven and bake for 25-30 minutes. Check for doneness by inserting a toothpick into the center of the cakes; it should come out clean. This visual cue ensures your Pink Velvet Cake is beautifully baked and ready for cooling.
Step 8: Cool the Cakes
Once baked, remove the cakes from the oven and let them cool in the pans for about 10 minutes. Afterward, carefully transfer them to wire racks to cool completely. It’s essential to allow your Pink Velvet Cake layers to cool thoroughly before frosting, otherwise the cream will melt.
Step 9: Frost the Cake
Once the cakes are completely cooled, it’s time to frost! Spread a layer of creamy frosting on top of the first cake layer, then carefully place the second layer on top. Continue by frosting the top and sides of the cake as desired. Watch as your stunning Pink Velvet Cake comes to life, ready to impress everyone at your special celebration.
Expert Tips for Pink Velvet Cake
• Room Temperature Ingredients: Ensure all ingredients are at room temperature for optimal mixing and a smoother batter. This aids in achieving that luscious Pink Velvet Cake texture.
• Avoid Overmixing: Once you combine the dry and wet ingredients, mix gently to avoid overmixing. Doing so will help keep your cake light and fluffy.
• Check for Doneness: Tap the cake pan gently when baking; it should spring back when lightly touched. Use a toothpick to confirm it comes out clean for a perfect Pink Velvet Cake.
• Cool Completely Before Frosting: Let your cakes cool completely on wire racks prior to frosting to prevent the creamy frosting from melting into a warm cake.
• Experiment with Flavor: Feel free to add almond extract or lemon zest for a refreshing twist to the traditional flavor. Small adjustments can create uniquely delightful results!
Pink Velvet Cake Variations
Feel free to get creative with your Pink Velvet Cake; it can easily be tailored to suit your taste preferences!
-
Frosting Options: Swap cream cheese frosting for fluffy buttercream or a light whipped cream for a different flavor profile. Each option adds its unique charm to the cake.
-
Berry Bliss: Top the cake with fresh berries like strawberries or raspberries for a vibrant touch. The tartness of the berries beautifully contrasts the sweetness of the cake, creating delightful layers of flavor.
-
Flavor Infusion: Add 1 teaspoon of almond extract or lemon zest to the batter for a refreshing twist. This little adjustment can elevate the cake experience and impress your guests.
-
Texture Enhancer: Fold in ½ cup of chopped nuts or chocolate chips into the batter for extra crunch. The added texture not only enhances flavor but also makes each slice a delightful surprise.
-
Color Varieties: Experiment with natural food coloring derived from beet juice or hibiscus powder for a more earthy hue. This twist makes your Pink Velvet Cake just as stunning but with a different flair.
-
Decadent Layering: Slice your cake layers horizontally once cooled and spread a layer of fruit preserves or chocolate ganache between them for an extra layer of flavor. This added treat makes every bite even more enjoyable!
-
Ice Cream Surprise: Serve slices of cake with a scoop of vanilla ice cream for a delightful dessert. The creaminess of the ice cream pairs beautifully with the fluffy cake; a classic combination that everyone adores.
If you’re craving more sweet inspiration, you might love making the decadent Gingerbread Wreath Cake or the delicious Salted Caramel Cake for your next special occasion!
What to Serve with Enchanting Mother’s Day Pink Velvet Cake
Elevate your special occasion with delightful pairings that will make every slice of this enchanting cake even more memorable.
-
Fresh Berries: Juicy strawberries, blueberries, or raspberries add a pop of color and tangy sweetness that perfectly balance the rich frosting. Their vibrant flavors will enhance the cake’s enchanting appeal.
-
Vanilla Ice Cream: A scoop of silky vanilla ice cream creates a creamy contrast that melts into the cake’s layers, offering a delightful temperature and texture combination in each bite.
-
Sparkling Lemonade: Refreshing and bubbly, sparkling lemonade brings a zesty kick that cuts through the cake’s richness, making it a festive drink choice for any celebration.
-
Minted Whipped Cream: Light and fluffy whipped cream infused with fresh mint adds an aromatic and refreshing touch that complements both the cake’s sweetness and creaminess.
-
Chocolate-Covered Strawberries: These indulgent treats provide an extra sweet and decadent twist that harmonizes beautifully with the Pink Velvet Cake, offering a delightful chocolate contrast.
-
Nutty Biscotti: Crunchy and slightly sweet, nutty biscotti make for a great pairing, inviting a delightful texture alongside your moist and fluffy cake.
-
Tea or Coffee: A warm cup of aromatic tea or coffee is the perfect accompaniment, balancing the cake’s sweetness while providing a soothing element to your gathering.
-
Dark Chocolate Ganache: Drizzling a bit of rich dark chocolate ganache adds an elegant touch that turns your cake into a true centerpiece of indulgence.
-
Almond Milk: This smooth and nutty plant-based drink is a lovely, lighter option for those looking for a refreshing beverage that complements the cake’s flavors without overpowering them.
Make Ahead Options
Preparing the enchanting Mother’s Day Pink Velvet Cake ahead of time can save precious hours on your special day! You can bake the cake layers up to 24 hours in advance. Once they’ve cooled, wrap each layer tightly in plastic wrap and refrigerate to lock in moisture. Additionally, you can prepare the creamy frosting in advance; store it in an airtight container in the refrigerator for up to 3 days. On the day of serving, simply frost the cake right before presenting it to your guests to ensure it looks and tastes fresh. This way, the Pink Velvet Cake will be just as delicious and stunning, allowing you to savor the moment without the last-minute rush!
Storage Tips for Pink Velvet Cake
Room Temperature: Keep leftover Pink Velvet Cake in an airtight container at room temperature for up to 3 days to maintain freshness and flavor.
Fridge: Store the cake in the refrigerator for up to 1 week. Make sure it’s wrapped properly to prevent it from drying out and absorbing any unwanted odors.
Freezer: To freeze, wrap individual slices or the whole cake tightly in plastic wrap, then in aluminum foil. It can last in the freezer for up to 3 months.
Reheating: When ready to enjoy, thaw the cake in the fridge overnight. For a warm, comforting touch, gently microwave individual slices for about 15-20 seconds before serving.
Mother’s Day Pink Velvet Cake Recipe FAQs
How do I know if my ingredients are ripe or suitable for this recipe?
Absolutely! Use fresh, high-quality ingredients for the best results. For example, when choosing large eggs, look for ones with smooth shells and no cracks. For your butter, it should be soft but still slightly cool to the touch, not melted. If you’re using buttermilk, ensure it’s within the expiration date, and it should have a slightly tangy scent. This will ensure your Pink Velvet Cake has the moisture and richness it needs!
How should I store leftover Pink Velvet Cake?
Very simple! You can keep any leftover cake in an airtight container at room temperature for 2-3 days. If you’d like to extend its life, store it in the refrigerator for up to a week. Just be sure it’s well-covered to prevent drying out. I often place a piece of wax paper on top before sealing to help maintain moisture.
Can I freeze my Pink Velvet Cake?
Yes, you absolutely can! To freeze, first allow the cake to cool completely. Then, wrap individual slices or the whole cake tightly in plastic wrap. Follow up with aluminum foil for an extra layer of protection against freezer burn. Properly wrapped, your Pink Velvet Cake can be frozen for up to 3 months. Thaw it in the fridge overnight before indulging!
What should I do if my Pink Velvet Cake turns out dry?
Oh no, I’m sorry to hear that! Dryness often comes from overmixing or baking too long. To remedy this in future attempts, be gentle when combining wet and dry ingredients—mix just until combined for that airy texture. Also, always keep an eye on your cake towards the end of the baking time and do the toothpick test to check for doneness. Ideally, you want the toothpick to come out clean but avoid overbaking, as even a few extra minutes can dry out that delightful cake.
Are there any dietary considerations for this Pink Velvet Cake?
Definitely! If you’re making this for someone with allergies or dietary restrictions, you can make some adjustments. For a dairy-free version, use non-dairy milk and a dairy-free butter substitute in your cake and frosting. If you’re concerned about gluten, substitute gluten-free all-purpose flour for the cake flour, ensuring that your baking powder is also gluten-free. Always read labels to ensure they’re safe for anyone with severe allergies.
What’s an easy way to add a twist to this classic Pink Velvet Cake?
How fun! You can experiment with flavor by incorporating almond extract or lemon zest into the batter for a refreshing twist. Simply add about a teaspoon of extract or the zest of one lemon when combining the wet ingredients. This small adjustment can elevate your Pink Velvet Cake with a delightful new taste everyone will love!
Decadent Pink Velvet Cake for a Memorable Mother's Day
Ingredients
Equipment
Method
- Preheat your oven to 350°F (175°C) and grease and flour two 9-inch round cake pans.
- In a large mixing bowl, whisk together the cake flour, cocoa powder, baking powder, and salt.
- In a separate bowl, cream the butter and sugar for about 3 minutes until light and fluffy.
- Add eggs, one at a time, mixing well after each addition.
- Mix in the buttermilk, vanilla extract, and food coloring until combined.
- Fold the dry ingredients into the wet mixture gently until just combined.
- Divide the batter evenly between the prepared pans and bake for 25-30 minutes.
- Let the cakes cool in the pans for about 10 minutes, then transfer to wire racks.
- Frost the cooled cakes with the creamy frosting as desired.
Leave a Reply