
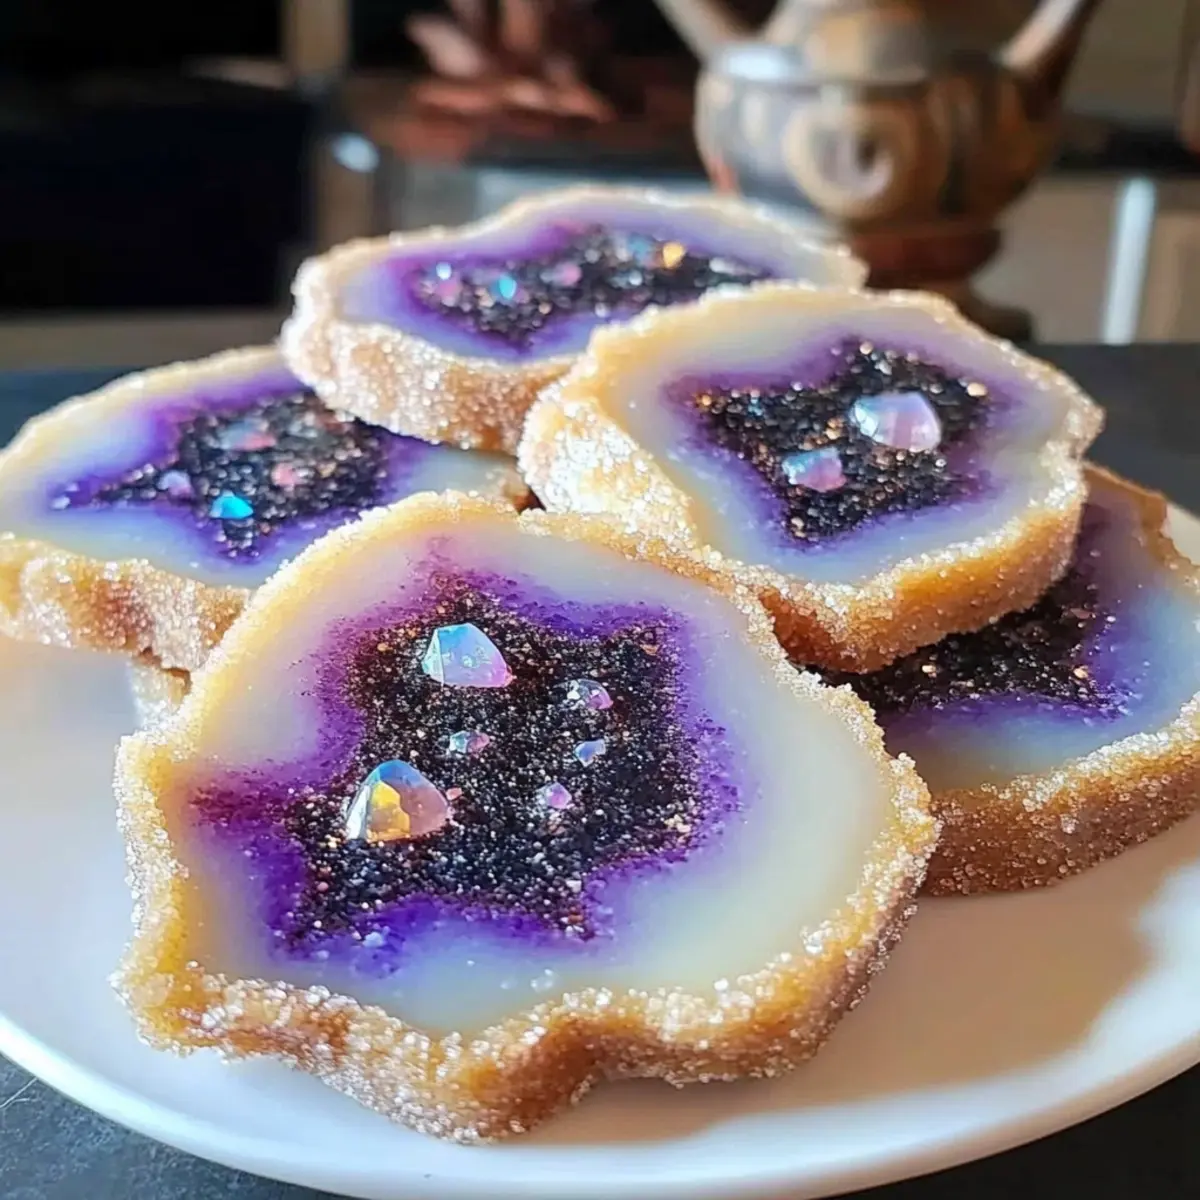
As I stood in my kitchen, a burst of color caught my eye, bringing to mind the stunning beauty of geodes hidden deep within the Earth. This inspiration led me to create my Irresistible Geode Cookies, a treat that dazzles not only the taste buds but the eyes as well. These soft, chewy bites are brilliantly adorned with candy crystals, making them a vibrant addition to any dessert table or cozy gathering. Not only do they offer a fun twist on classic cookies, but they also provide a delightful way to unleash your creativity in the kitchen. Whether you’re whipping them up for a birthday party or simply to surprise your loved ones, these cookies promise a sweet adventure. Are you ready to embark on this colorful baking journey?
Why are Geode Cookies a must-try?
Vibrant Visual Appeal: These cookies are a feast for the eyes, showcasing colorful candy crystals that mimic the stunning beauty of real geodes.
Easy to Make: With straightforward steps, even beginner bakers can create these delightful jewels without stress.
Deliciously Soft Texture: Each cookie offers a chewy center with a sugary crunch that satisfies every palate, making them crowd-pleasers for all ages.
Customizable Creations: Have fun experimenting by swapping candy colors or adding chocolate chips for a unique cookie experience. Check out my Gingerbread Thumbprint Cookies for more inspiring ideas!
Perfect for Any Occasion: Whether for a birthday party or just a cozy night in, these cookies elevate any gathering. Their whimsical nature guarantees smiles all around!
Geode Cookies Ingredients
For the Cookie Dough
• All-Purpose Flour – Provides structure to the cookies and is essential for that perfect chewy bite.
• Baking Soda – Acts as a leavening agent, creating the light and airy texture we all love.
• Granulated Sugar – Contributes sweetness and helps with caramelization; swap with coconut sugar for a lower glycemic treat.
• Brown Sugar – Adds moisture and a deeper flavor that enhances the overall taste of the cookies.
• Unsalted Butter – Provides richness and essential fat; can be swapped for margarine if you’re looking for a dairy-free option.
• Eggs – Binds the ingredients together and adds moisture; for a vegan version, substitute with flax eggs.
• Vanilla Extract – Enhances the flavor profile; consider almond extract for a distinctive twist.
For the Geode Effect
• Candy Crystals/Rock Candy – Creates the vibrant geode effect and adds a fun crunch; feel free to mix and match colors for customization!
With these simple yet essential ingredients, you’re just a few steps away from baking the most delightful Geode Cookies that will wow your family and friends!
Step‑by‑Step Instructions for Geode Cookies
Step 1: Preheat the Oven
Begin by preheating your oven to 350°F (175°C). While the oven is warming up, take the time to line two baking sheets with parchment paper. This will ensure that your Geode Cookies bake evenly and effortlessly release once they’re ready.
Step 2: Mix Dry Ingredients
In a medium bowl, whisk together 2 cups of all-purpose flour and 1 teaspoon of baking soda until well combined. This mixture will provide the necessary structure for your cookies, so ensure there are no lumps. Set it aside while you prepare the wet ingredients to keep the process smooth.
Step 3: Cream Butter and Sugars
In a large mixing bowl, cream together 1 cup of softened unsalted butter, ½ cup of granulated sugar, and ½ cup of brown sugar using an electric mixer. Beat the mixture on medium speed until it becomes light and fluffy—about 2-3 minutes. This step is crucial for achieving the perfect texture in your Geode Cookies.
Step 4: Add Eggs and Vanilla
Next, add in 2 large eggs, one at a time, along with 1 teaspoon of vanilla extract to the creamed mixture. Beat on medium speed until the mixture is smooth and well combined. This addition will enhance the flavor and create a beautifully moist cookie dough.
Step 5: Combine Ingredients
Gradually add the dry flour mixture to the wet ingredients, mixing on low speed until just combined. Be mindful not to overmix, as this can lead to dense cookies. You want your dough to be thick and slightly sticky, which is perfect for your Geode Cookies.
Step 6: Incorporate Candy Crystals
Gently fold in 1 cup of colorful candy crystals or rock candy using a spatula. This will give your cookies their stunning geode appearance. Ensure that the candies are evenly distributed throughout the dough to create a beautiful and vibrant finish in every bite.
Step 7: Scoop and Bake
Using a cookie scoop or tablespoon, portion out the dough onto the prepared baking sheets, spacing them about 2 inches apart. Bake the Geode Cookies in your preheated oven for 10-12 minutes, or until the edges are golden and the centers remain soft and slightly puffy.
Step 8: Cool the Cookies
Once baked, remove the cookies from the oven and let them cool on the baking sheets for about 5 minutes. Then, carefully transfer them to wire racks to cool completely. Allowing the cookies to cool will help them set and enhance their chewy texture.

Make Ahead Options
These Geode Cookies are perfect for busy home cooks who need a little help with meal prep! You can prepare the cookie dough up to 24 hours in advance—simply mix all the ingredients as directed, but hold off on adding the colorful candy crystals until you’re ready to bake. Store the dough in an airtight container in the refrigerator to maintain its quality. When you’re set to serve, scoop the dough onto your baking sheets, fold in the candy crystals, and bake as directed. This way, you can enjoy warm, freshly baked Geode Cookies with minimal effort, making them a delightful treat for any gathering!
How to Store and Freeze Geode Cookies
Room Temperature: Store these delightful Geode Cookies in an airtight container at room temperature for up to 5 days to maintain their soft texture and vibrant colors.
Fridge: If you prefer a slightly firmer texture, you can refrigerate the cookies. This will keep them fresh for up to a week, but be sure to allow them to come to room temperature before serving for the best taste.
Freezer: For longer storage, place parchment paper between layers of cookies and freeze them in an airtight container for up to 3 months. When you’re ready to enjoy, simply thaw at room temperature or reheat in the microwave for 10-15 seconds.
Reheating: To restore that fresh-baked taste, gently reheat cookies in the microwave for about 10-15 seconds on a low setting, ensuring they don’t dry out.
Expert Tips for Geode Cookies
-
Mixing Method: Avoid overmixing after adding dry ingredients to keep your Geode Cookies soft and chewy. This is key for a delightful texture.
-
Proper Baking Time: For a tender center, slightly underbake your cookies. They will continue cooking on the baking sheet as they cool, creating the perfect bite.
-
Flavor Variations: Feel free to add food coloring to the dough or experiment with different extracts, like almond, to customize your Geode Cookies further.
-
Candy Choices: Use a variety of candy crystals for a vibrant geode effect. Mixing different colors not only looks stunning but also adds fun flavor combinations.
-
Storage Savvy: Keep your cookies fresh by storing them in an airtight container at room temperature or freeze for long-term storage. Parchment paper between layers prevents sticking.
What to Serve with Geode Cookies
These colorful treats are perfect for creating a delightful meal experience that delights every age.
- Cold Glass of Milk: A classic pairing that enhances the sweetness of the Geode Cookies, making each bite even more enjoyable.
- Vanilla Ice Cream: Serve warm Geode Cookies with a scoop of vanilla ice cream for a melty, dreamy combination that’s irresistible.
- Fruity Fruit Salad: Fresh, vibrant fruit salad adds a burst of colors and flavors, balancing the sweetness of the cookies with refreshing juiciness.
- Sweet Tea or Lemonade: A chilled beverage complements the sugary notes of the cookies and keeps the festive, casual feel alive.
- Chocolate Dipped Strawberries: These delightful treats provide a classy touch that contrasts beautifully with the playful nature of Geode Cookies.
- Decadent Brownies: Rich and fudgy brownies create a dessert spread that excites the senses and invites sharing, ideal for gatherings.
- Coffee or Latte: A warm cup of coffee elevates the cookie experience, bringing rich, roasted flavors to balance the cookies’ sweetness.
- Mini Cheesecakes: Their creamy texture and tangy flavor contrast perfectly with the chewy Geode Cookies, creating a delightful dessert mix.
- Nutty Snack Mix: A crunchy trail mix adds a deliciously savory component, offering a variety of textures to enjoy alongside your cookies.
Geode Cookies: Delightful Customization Ideas
Get ready to put your personal spin on these vibrant treats and let your creativity shine through each delicious bite!
- Almond Extract: Swap vanilla for almond extract to create a nutty twist that elevates the flavor.
- Chocolate Chips: Fold in some chocolate chips for a rich, decadent addition that complements the sweet candy crystals beautifully.
- Vegan Twist: Replace eggs with flax eggs for a delightful vegan version that everyone will love!
- Coconut Sugar: Use coconut sugar instead of granulated sugar for a lower glycemic option that doesn’t skimp on sweetness.
- Sprinkle Joy: Top the cookies with colorful sprinkles before baking for an extra pop of fun and flavor.
- Spicy Kick: Incorporate a dash of cayenne pepper for a surprising hint of heat that contrasts the sweet elements.
- Festive Colors: Use seasonal candy crystals, such as red and green for Christmas or pastel shades for springtime, to make any occasion extra special. For more vibrant ideas, check out my Gingerbread Thumbprint Cookies.
- Nutty Crunch: Add crushed nuts like pecans or walnuts for a delightful texture that pairs perfectly with the chewy cookie base.
With these variations at your fingertips, your Geode Cookies are sure to become the talk of the table!

Geode Cookies Recipe FAQs
What type of candy crystals should I use for the geode effect?
Absolutely! I recommend using colorful candy crystals or rock candy to achieve that stunning geode appearance. You can mix and match colors for added visual appeal—think pinks, blues, and greens mimicking the natural beauty of geodes!
How should I store Geode Cookies to keep them fresh?
For optimal freshness, store your Geode Cookies in an airtight container at room temperature for up to 5 days. If you prefer a firmer texture, refrigerating them can keep them fresh for up to a week. Just remember to let them come back to room temperature before enjoying to savor all their delightful flavors!
Can I freeze Geode Cookies for later use?
The more the merrier! To freeze your Geode Cookies, stack them in an airtight container with parchment paper between layers to prevent sticking. They can be stored this way for up to 3 months. When you’re ready to enjoy them, simply thaw at room temperature or reheat in the microwave for 10-15 seconds to rediscover that fresh-baked taste.
What if my cookies spread too much while baking?
If your Geode Cookies spread too much during baking, it could be due to using warm butter instead of softened butter or not chilling the dough before baking. To prevent this, make sure your butter is at room temperature (not melted) when you cream it. Also, consider chilling the dough for about 30 minutes in the fridge before scooping and baking.
Are there any dietary adjustments I can make for the Geode Cookies?
Very! If you or someone you’re baking for has dietary restrictions, you can easily customize the recipe. For a dairy-free option, replace the unsalted butter with margarine. To make them vegan, use flax eggs in place of regular eggs (1 tablespoon of ground flaxseed mixed with 3 tablespoons of water equals one egg). Just remember to adjust the baking times for any changes!

Colorful Geode Cookies: A Delightful Twist on Classic Treats
Ingredients
Equipment
Method
- Preheat the oven to 350°F (175°C) and line two baking sheets with parchment paper.
- In a medium bowl, whisk together 2 cups of all-purpose flour and 1 teaspoon of baking soda until well combined.
- In a large mixing bowl, cream together 1 cup of softened unsalted butter, ½ cup of granulated sugar, and ½ cup of brown sugar.
- Add in 2 large eggs and 1 teaspoon of vanilla extract, beating until smooth.
- Gradually add the dry flour mixture to the wet ingredients, mixing on low speed until just combined.
- Gently fold in 1 cup of colorful candy crystals or rock candy.
- Portion out the dough onto the prepared baking sheets, spacing about 2 inches apart, and bake for 10-12 minutes.
- Let the cookies cool on the baking sheets for about 5 minutes before transferring to wire racks.
Leave a Reply